Achieving long-lasting curls is like creating a masterpiece. It requires the right tools, technique, and a touch of patience. Whether you’re rocking loose waves, bouncy ringlets, or coily spirals, layering your hair products correctly can make all the difference in maintaining that picture-perfect curl from dawn to dusk. Let’s dive into the ultimate guide to layering products for curls that last.

Step 1: Start with a Clean Slate
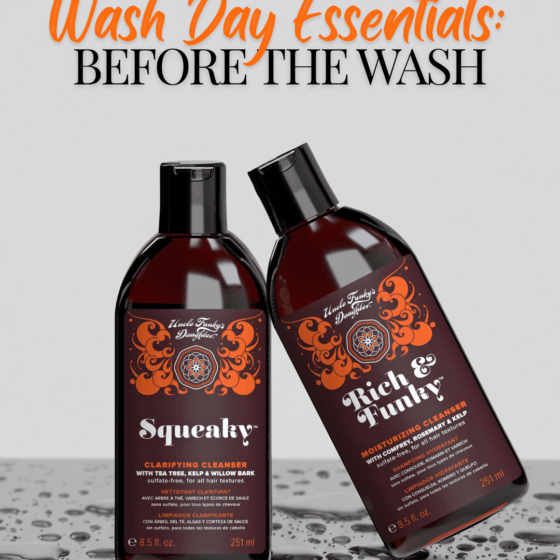
Before you begin layering, it’s essential to start with clean, well-moisturized hair. Rich & Funky will cleanse your curls without stripping away natural oils, while Richee Rich will hydrate and prepare your hair for the layers to come. For an extra moisture boost, consider the Heal & Renew intensive hair masque to keep your curls hydrated throughout the day. Remember, moisture is the foundation of long-lasting curls.
Step 2: Apply a Leave-In Conditioner
The first layer in your curly hair routine should be Thirsty Curls or Midnite Train. These leave-in sprays not only provide additional moisture but also serve as a base for the products that will follow. Distribute the leave-in evenly through damp hair, ensuring every strand is coated. This step helps to detangle and sets the stage for defining your curls.
Step 3: Add a Curl Cream or Gel
Next up is your curl cream or gel. The choice between the two depends on your hair type and the level of hold you desire. Supercurl is a curl cream ideal for those seeking soft, touchable curls with a natural finish. On the other hand, Curly Magic provides a stronger hold and is perfect for keeping those curls defined all day long. For the best results, pair Supercurl and Curly Magic together and work the product through your hair in sections, ensuring that each curl is defined and frizz-free.
Step 4: Seal with an Oil
To lock in moisture and add shine, follow up with the 3-in-1 Shine Booster. Infused with a blend of 11 essential oils, it not only enhances shine but also fortifies your hair, reduces frizz, and leaves it irresistibly smooth and healthy-looking. Apply a small amount to your palms, rub them together, and gently scrunch the oil into your curls, focusing on the ends where your hair tends to be driest.
Step 5: Finish with a Styling Mousse (Optional)
For those with finer curls or those seeking extra volume, a styling mousse can be the final layer. Mousse provides a lightweight hold and can give your curls that extra bounce without the crunch. Apply it sparingly to avoid stiffness, and focus on the roots for added lift.
Step 6: Dry with Care
The way you dry your curls is just as important as the products you use. Air drying is the gentlest option, but if you’re short on time, use a diffuser attachment on your blow dryer. The key is to avoid touching your curls too much, as this can cause frizz and disrupt the curl pattern. Flip your head upside down while diffusing to enhance volume.
Step 7: Refresh with a Mist
As the day goes on, your curls might need a little pick-me-up. Keep a curl-refreshing mist handy to revive your curls and add moisture back into your hair. A few spritzes and a gentle scrunch can bring your curls back to life without weighing them down.
Layering your hair products is an art that, when done right, can lead to curls that last all day and beyond. Remember, the key to success is starting with a strong foundation of moisture, followed by layers that define, seal, and protect. Experiment with different products and techniques to find the perfect combination for your curls. With the right layering strategy, you’ll be flaunting fabulous, long-lasting curls that turn heads wherever you go!